Introduction to Educational Video Content Creation and Planning a video lesson
| Site: | Up2DigiSchool Moodle |
| Course: | Module II. EDUCATIONAL VIDEO CONTENT CREATION (8 hours) |
| Book: | Introduction to Educational Video Content Creation and Planning a video lesson |
| Printed by: | Guest user |
| Date: | Thursday, 23 July 2026, 1:04 AM |
In this tutorial
In this tutorial, we explore:
- types of video and what we call educational video;
- how to prepare for a video and how to ensure the quality of the video;
- the most popular audio and video recording tools available for creating an educational video lesson, and what elements are most important to consider;
- planning a video lesson.
Types of educational videos
- The target audience, the information you want to convey, the learning objectives and many other factors determine which type of training video is best suited for you.
- Below are 6 types of educational videos, five of which are described by Nahla Davies (2021)
The most important quality factors
When making an educational video, it is not worth wasting time on a poor-quality result. Of course, your behaviour in front of the camera will improve as you gain more experience, so don't start with too high expectations. It is important to take care of the technical aspects that can make a big difference to the quality of the video:Tools for audio and video recording
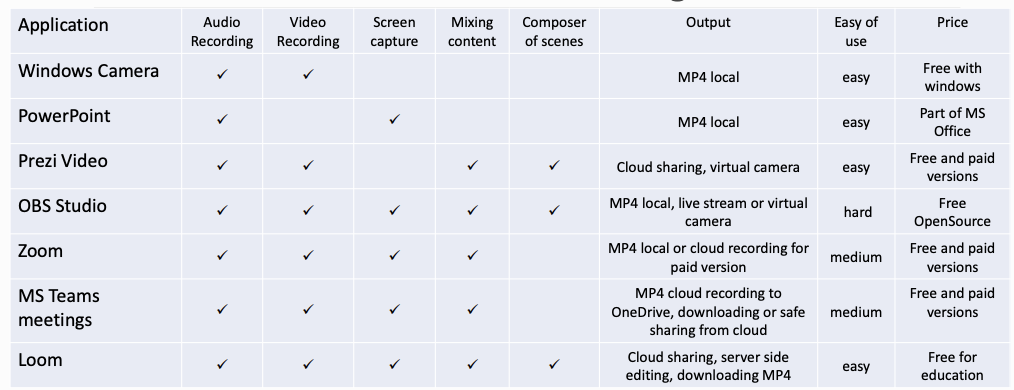
There are many tools for audio and video recording. Recording on the camcorder or smartphone may
vary from device to device but usually are quite intuitive. We will review most popular software
applications used for video/audio recording and will provide with comparison of main features.
- Camera is a free application that comes preinstalled on Windows 10 or 11. It is very easy to use and have basic settings of video quality. We recommend to switch on Pro mode where you will be able to manually control brightness, color balance and some other functions (list of functions may depend on capabilities of the connected camera).
- PowerPoint well known for its presentation creation capabilities but also can be used for recording of
audio and screen capture videos. It is very easy to use straight from the Insert menu group. Recordings
are inserted into the current slide, but can be saved as separate file by right clicking on the recorded
object and choosing “Save Media as…” menu. Screen capture is working only on Windows and is not
supported on PowerPoint for Mac.
- Prezi Video is a separate app from well know presentation creation software Prezi. It allows to combine
camera video with overlay text, pictures and even screen capture. You can choose layout template
from the library and prepare your overlay information in the scenario sequence where you enter your
text and insert pictures from integrated library or your computer. Recorded video can be published for
hosting on Prezi cloud or be saved locally to your computer. You can use live output from Prezi Video
as a virtual camera for Zoom, Teams meetings or other application. Free version has some limitations
and comes with Prezi logo overlay in the top-left corner. Plans for more feature rich Education version
starts from 3USD/month.
- OBS Studio from Open Broadcaster Software is a powerful and versatile open source application for
professional video recording and live online broadcasting. You can mix your live video and audio from
many layers and sources, prepare scenes with different presets and transitions, record locally and in
parallel stream live to any platform of your choice as well as feed output as a virtual camera to any
other software. OBS functionality can be extended by using variety of plugins. The only downside of
this software - user interface is quite overloaded with a lot of functions and not so quick to master
when you are just starting.
- SplitCam is also a free software and can be considered as a bit simpler and less powerful alternative
to OBS Studio.
- Zoom is primarily meant for video communication and video recording is just a secondary function.
Nevertheless, Zoom can be considered as an easy tool for video recording as far as many teachers are
already familiar with its functionality. It came as a default solution for recording of live online lesons
and licensed users can even record and share videos on Zoom Cloud. Check if you are using HD video
mode on your Zoom app settings. Some Zoom settings can be change only on the website in your Zoom profile Settings page. Here you might be able to activate Full HD (1080P) for Group HD video. In case
you have a license and planning to edit recorded Zoom leson, you can enable “Record active speaker,
gallery view and shared screen separately” on your Zoom profile settings page. In this way you will get
separate video files of shared screen, speaker and participants and will have more flexibility in post
processing the final video. Please note that some options may depend on organisational settings and
can be unavailable for you.
- MS Teams meetings is a competing solution to Zoom also used for video communication and capable
to record video session. Recording is usually stored on MS OneDrive and can be downloaded for further
post processing. MS Teams does not have possibility to record separately video and screen share, thus
in comparison to Zoom post processing is more limited here.
- Loom is one of many tools dedicated for creating tutorial or explainer screen capture videos. It is
recommended here because of friendly interface, feature rich functionality and free unlimited version
for educators (https://www.loom.com/education).Sharing of the video supports responsive
embedding, password protection and restriction to specific persons with defined e-mails. You can also
enable feedback features such as emoji reactions or in place commenting.
Tools for audio and video editing
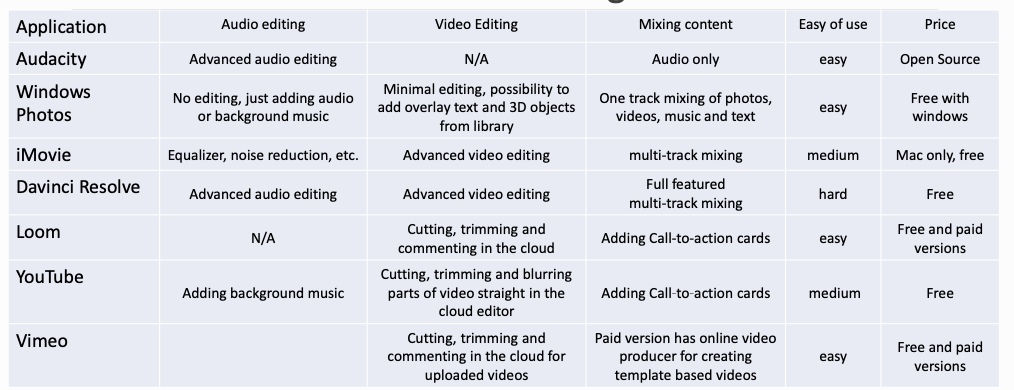
One of the main criteria in selecting and recommending tools for audio and video editing was free
availability for educators.
- Audacity is a most popular open-source audio recording and editing software. It provides with huge variety of audio processing features and is quite easy to use as main functions are very easy and straight forward.
- Photos app integrated into Windows 10 and 11 are hiding simple and quite easy to use video editor. It allows to compose video from several episodes, have easy splitting and trimming features. Editing is limited to one track mixing of photos and videos by adding audio or background music, overlay text and some 3D objects from library.
- iMovie is freely available for Mac users only. It has good editing capabilities and is not so difficult to learn.
- Davinci Resolve from Blackmagic is a powerful and full featured video editing software package. Free version is enough even for professional video editing but be ready to spend some time for learning how to use it by watching some video tutorials.
- YouTube is a repository but has quite simple and surprisingly convenient online video editor. It allows
very precise trimming and deleting unnecessary parts of the video. There is also unique feature of easy
blurring parts of the video even by recognising and tracking a moving object. It takes some time for
edited videos to get processed but when processing is done, you can download edited version to your
computer and can reuse it in other projects.
- Vimeo quite recently has also revealed video editing capabilities. It has features of cutting, trimming and commenting in the cloud for uploaded videos.
- Loom is hardly can be considered as a universal video editor but it has one unique feature that resulted
in adding it to this list - Loom has very fast and non-destructive trimming and cutting of unnecessary
parts of the video straight inside Loom Cloud storage.
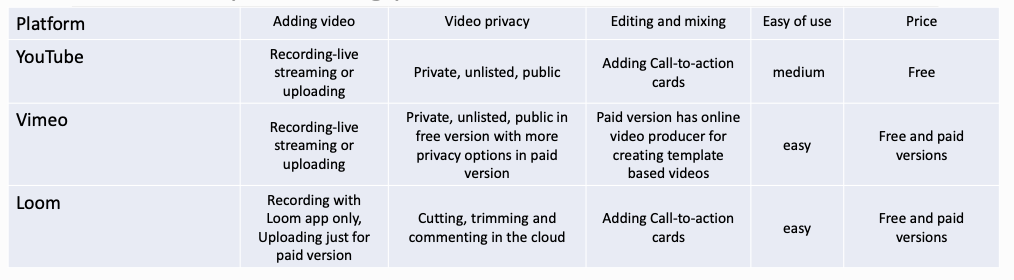
Video publishing platforms
Unfortunately, there are not so many video publishing platforms that are reliable, free of charge and
available internationally. In many cases such repositories are created using proprietary software and
are limited to institutional or national use. Thus, we are forced to stick with well known options of
Youtube and Vimeo. We are also adding Loom to this group as in the paid version you can also upload
and host your own videos.
Planning a video lesson
To create successful instructional videos, it’s important to plan your content by establishing your audience, topic, script, overall goal, and video sharing platforms. No matter the video topic or genre, exceptional planning means well-produced videos. Effectively plan and create a video tutorial that informs your viewers and engages with your target audience.
- Decide who your target audience is and what the best ways are to communicate and connect with them.
- Choose a topic, research, set a goal, and plan a script for your tutorial video with an easy-to-follow layout.
- Explore how you are going to easily record and create your tutorial video.
- Review social media platforms and select a platform that best suits your instructional content.
Why is it necessary to plan a video lesson?
We all know that lesson planning is not a five-minute exercise, and creating a solid plan takes time. Without a lesson plan, there is a risk that we will not be able to use the video time effectively and will fail to achieve the lesson's objective.
What are the important elements of a video lesson plan?
A good video lesson plan should have a clearly defined learning objective (video goal), clear and engaging content, and include opportunities for learner reflection.
Stages of video creation:
- Sound. Find a space that is quiet and free from potential disturbances. Avoid recording outside or in a public place, as you won't be able to ensure the best possible sound quality.
- Visuals and background. Choose a flat and neutral background. Bright colors and cluttered backgrounds will distract your learners from what you are saying. If you need a table, make sure it is also neutral and free of unnecessary details.
- Lighting. Natural light is the best option, but you may not always be able to record using natural light. The next best option is artificial lighting that mimics natural light.
- Interaction. If you are showing or demonstrating a process, focus on your hands and the materials or actions on the computer. Try to keep your learners focused on what you are demonstrating, so avoid unnecessary gestures or clicks and zoom in on the relevant actions.
4️⃣ Editing the recording. Select an editing tool and perform the editing tasks according to the chosen video type and learning objectives.
5️⃣ Publishing the recording. Upload the video to a video sharing platform and make it availability your learners.
- Subject.
- The video should have a title and clearly defined objectives, explaining what will be presented in the video.
- Clear and engaging lesson content. Clearly plan and outline the content you want to present to the learners: explaining a theory, demonstrating an example, presenting a task and its results, etc. Focus on the content you are presenting, explaining or demonstrating the actions.
The lesson plan content can start by engaging learners and stimulating their thinking. A video is a powerful tool because it stimulates various senses. You can start the video by including a question or a set of questions, or an intriguing question. Then, present your content. -
Discussion/Summary. In the last few minutes of the video, show the final product or provide a summary of the entire lesson (content), perhaps reveal the answer to the intriguing question or provide a task. Also, invite the learners to complete a task or to leave a comment as feedback. This could be simply a reflection task.
Note: Your video can be part of your regular lesson as a learning object, or your video can be the full lesson with typical lesson elements. Therefore, it is important to plan this in advance.
The scenario
- For a video lesson, the presenter's slides usually act as the script
- When explaining how a product or service works (aspects of the topic) or showing "how to do", it is advisable to prepare a presentation plan and practice before filming
Easy Education Video Templates with online tools:
- Education Video Templates (Powtoon)
- Educational video templates (Canva)
- Education Video Templates (Vimeo)