Making, recording, and publishing a video lesson
| Site: | Up2DigiSchool Moodle |
| Course: | Module II. EDUCATIONAL VIDEO CONTENT CREATION (8 hours) |
| Book: | Making, recording, and publishing a video lesson |
| Printed by: | Guest user |
| Date: | Thursday, 23 July 2026, 1:04 AM |
In this tutorial
In this tutorial, we explore:
- video recording software (Loom, ZOOM, MS Teams, MS PowerPoint, Clipchamp, etc.);
- video editing capabilities and software (Loom, Clipchamp, OpenShot, etc.);
- publishing opportunities;
- creating interactive videos with H5P.
LOOM - video creation, editing, publishing
- With LOOM, you can simultaneously record video from your camera, microphone and desktop screen. Your video is then immediately saved to the LOOM repository and you can immediately share the recording as a link, embed code, download as a file and more.
- You can use LOOM as a tool after installation:
- as a plug-in to the Chrome browser,
- as an app on your computer (iOS, Windows) or a mobile app (Android app).
How start to recording?
- You can start recording by clicking on the Loom Chrome extension, as shown below.
- From here, you can decide what part of your screen you want to capture: Full Screen, Window, or Current Tab. You can choose Camera only if you don't want to record any of your screens.
- Choose if you want to record your Screen and Camera by toggling your Camera on or off.
- Select a microphone source or turn off your microphone. You will also see an audio indicator capturing audio before you start recording. This helps ensure sound in your recordings.
- To remove recording controls or adjust for low light, visit your Setting under the three dots '...' at the top of your recording menu.
- Once you're satisfied with your Recording Settings, go ahead and click Start Recording.

LOOM repository
All LOOM entries are immediately stored in the LOOM repository.
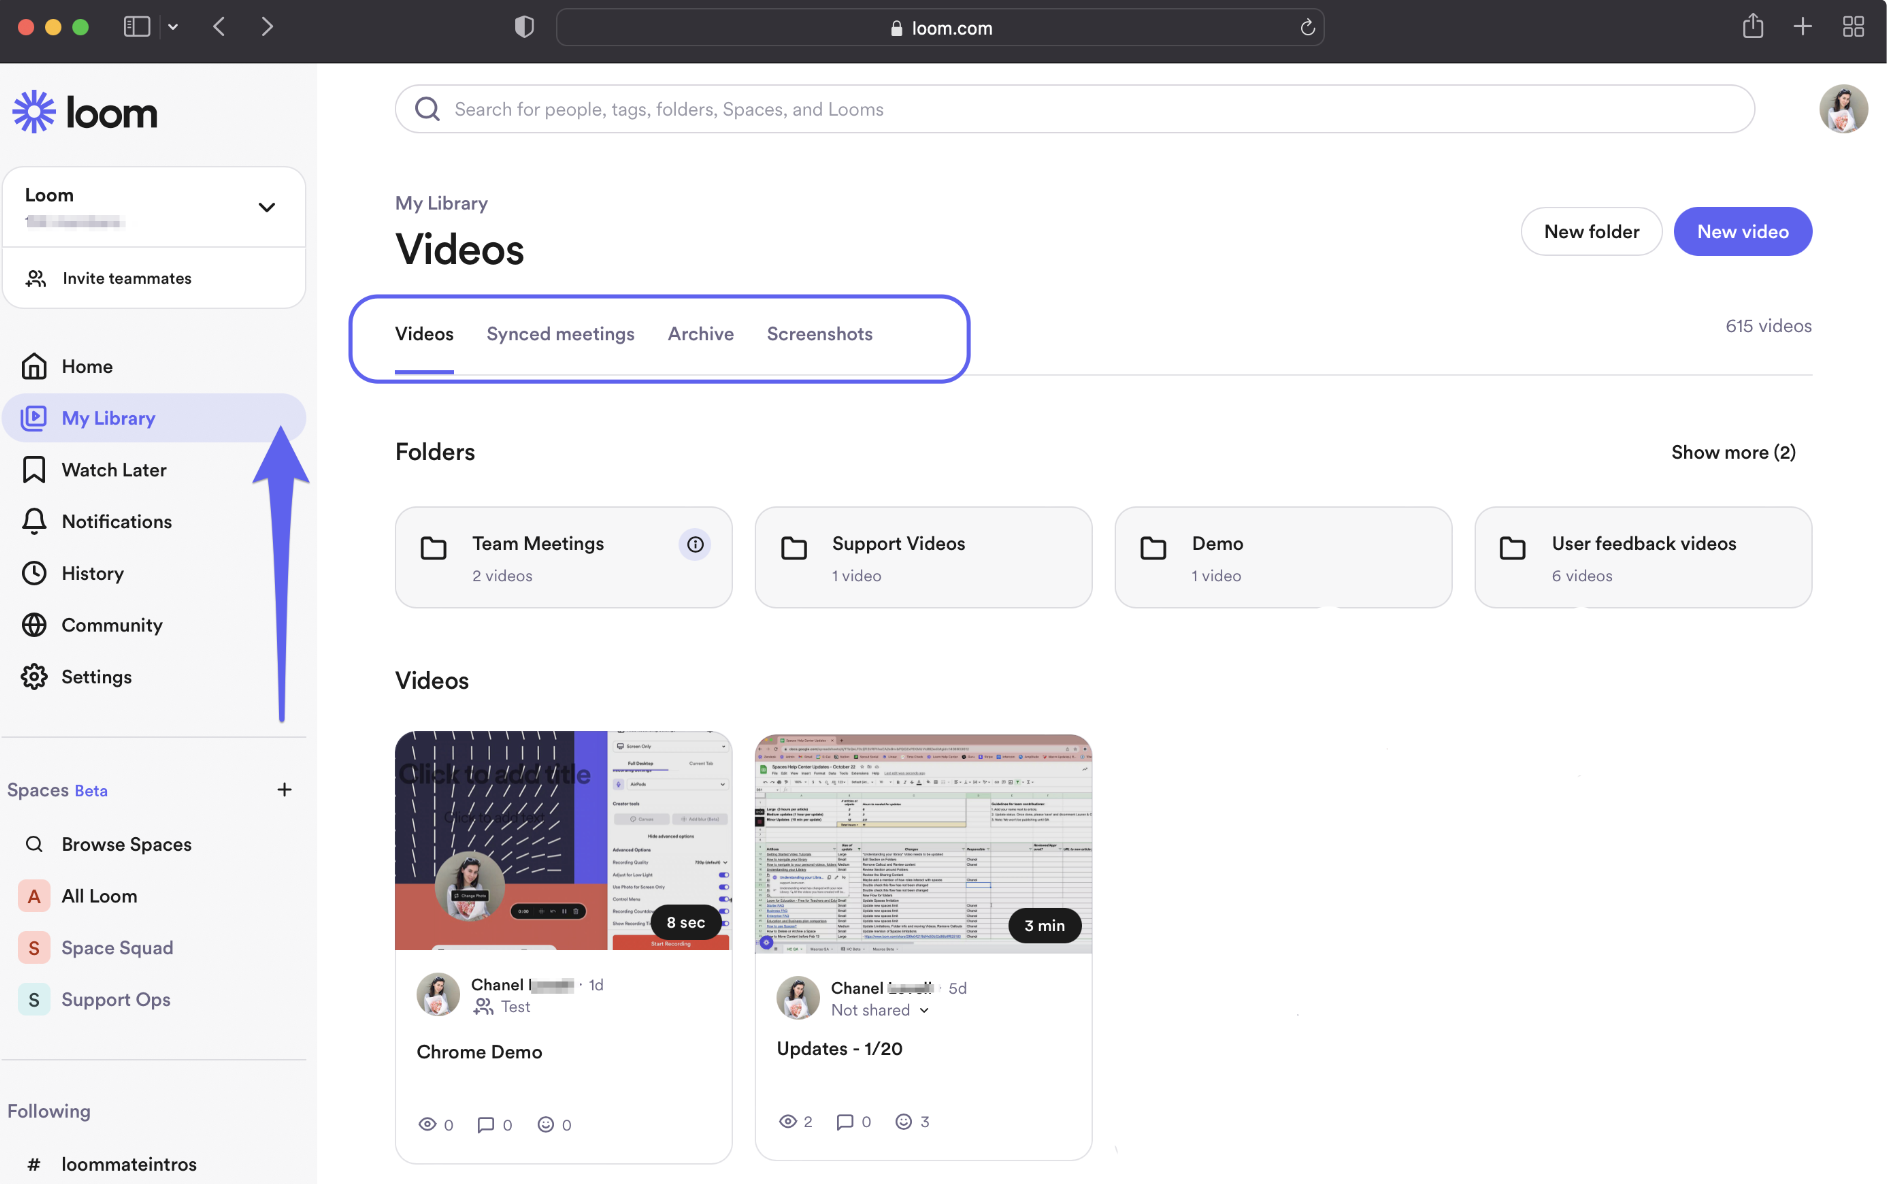
- To view or find the recordings you have created, you can find them at https://www.loom.com/looms/videos > My Library
- To share a recording, e.g. to upload it to your course, open the recording and click Share
More: 👉How to share your recording
ClipChamp
- Microsoft "Clipchamp" is a video editor designed to make video creation easy for everyone, even for those with no prior editing experience. It allows you to combine your videos, images, and audio files, as well as add text and effects, and then save the finished video to your computer. You can also safely record your screen and webcam, and enjoy advanced features like green screen editing, overlays, and AI voice interfaces.
- You can use it on Windows, Mac, Linux, and Chromebook. Clipchamp can get accessed by going to app.clipchamp.com in an Edge or Chrome browser window. Windows users can also download the official Microsoft Clipchamp app to edit on Windows 11 and Windows 10 devices.
- All you need to use the Clipchamp is a desktop or laptop computer with Google Chrome or Microsoft Edge installed. As Clipchamp is the official Windows video editor, you can also get started with the Microsoft Clipchamp app. On Windows 11 devices you can use Clipchamp's desktop app, just search for "Clipchamp" in the taskbar or via the Start menu. On Windows 10 devices, you can install the app.
Quick tutorial video for a demonstration of how Clipchamp works or scroll down for step-by-step instructions to help you get started using its editing features:
For more information, please see to the official documentation "Get started":
- 👉How to edit a video
- 👉Start editing a new video
- 👉Exporting and saving a video in Clipchamp
- 👉Sharing a Clipchamp video or project
Creating a Video with MS PowerPoint
1️⃣ Create your slide
- Create your PowerPoint slides. You should proceed just like you do when you are designing a PowerPoint presentation, as it will help structure your video with title, body and summary slides. Note: You are creating a video, not a presentation! Do not overload the slides with content, less is more.
- Add text: use your brand’s font and add element such as a title, a subtitle or a key message
- Add images: think about adding a background image to better frame your slide
- Add layer elements: you can play around with shapes and transparency to create a sense of depth in your slides.
- Add animations: animate the elements that compose your slides.
2️⃣ Record your video
- Open Microsoft PowerPoint and navigate to the record tab. Select Record from the upper right hand corner of the PowerPoint window.
- Select the cameo option to enable your webcam. Click the cameo button on the record toolbar. A blue placeholder circle will appear to preview the placement of your webcam recording overlay. If desired, you can customize the shape and add a border to your webcam recording. Note: make sure to enable the webcam and microphone permissions and select your mic and camera source.
- Record your presentation video. You will record your PowerPoint presentation slides, teleprompter, and webcam. A three-second countdown will appear. To stop recording, click on the stop recording button. You can preview your video before saving it.
- Save your finished PowerPoint video to your local device.
Resources and more information can be found here:
- 👉How to record your webcam in PowerPoint
- 👉How to record your webcam and PowerPoint in Clipchamp
- 👉Resize your video presentation for any platform
- 👉Tips to setup your video presentation recordings
Publishing Videos on YouTube
How to upload a video to YouTube
- Log in to your YouTube account.
- Click on the video icon at the top right-hand side of the window, which can be found next to your user icon, messages, apps and notifications.
- Click Upload a Video.
- Then, press Select files to find the video file saved on your computer. Or, you can drag and drop it into the window.
- Select your privacy settings. Privacy settings allow you to control who can and can’t see your video. YouTube provides the following options in the uploading process:
- Public: Anyone can view your video, and it will show up in YouTube search results. This is the standard setting and if you use YouTube to market your business or expand your reach, you’ll want to make your videos public.
- Unlisted: Unlisted videos are still public, but you’ll need to provide people with a direct link to see the video. In addition, these videos won’t appear in the YouTube search results or your video feed. For marketing purposes, you can use unlisted videos to promote exclusive deals or events.
- Private: Only you have viewing access.
- Once you’ve selected your preferred option, click Save.
YouTube's Video Editor
YouTube’s video editor is an extremely basic editing tool, butit can still let you trim clips out of any part of your video, so read on to learn how to chop up your videos right in the video platform.
- Sign in to YouTube Studio and click Content.
- Click the thumbnail of the video you want to edit.
- In the left sidebar, click Editor.
- Used Video editor tools edit your video.
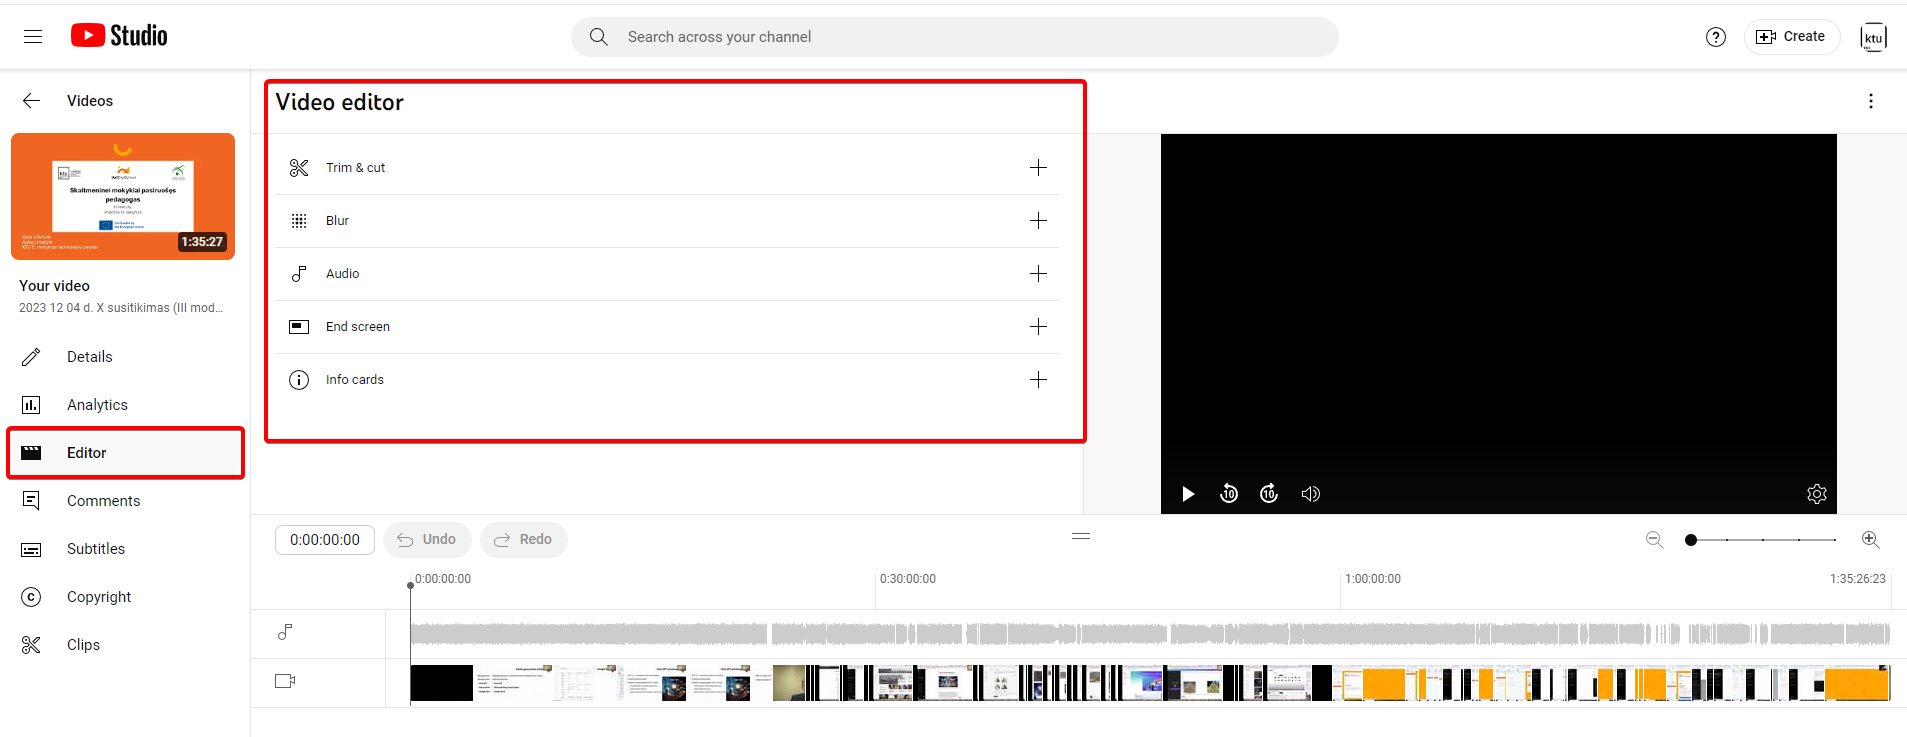
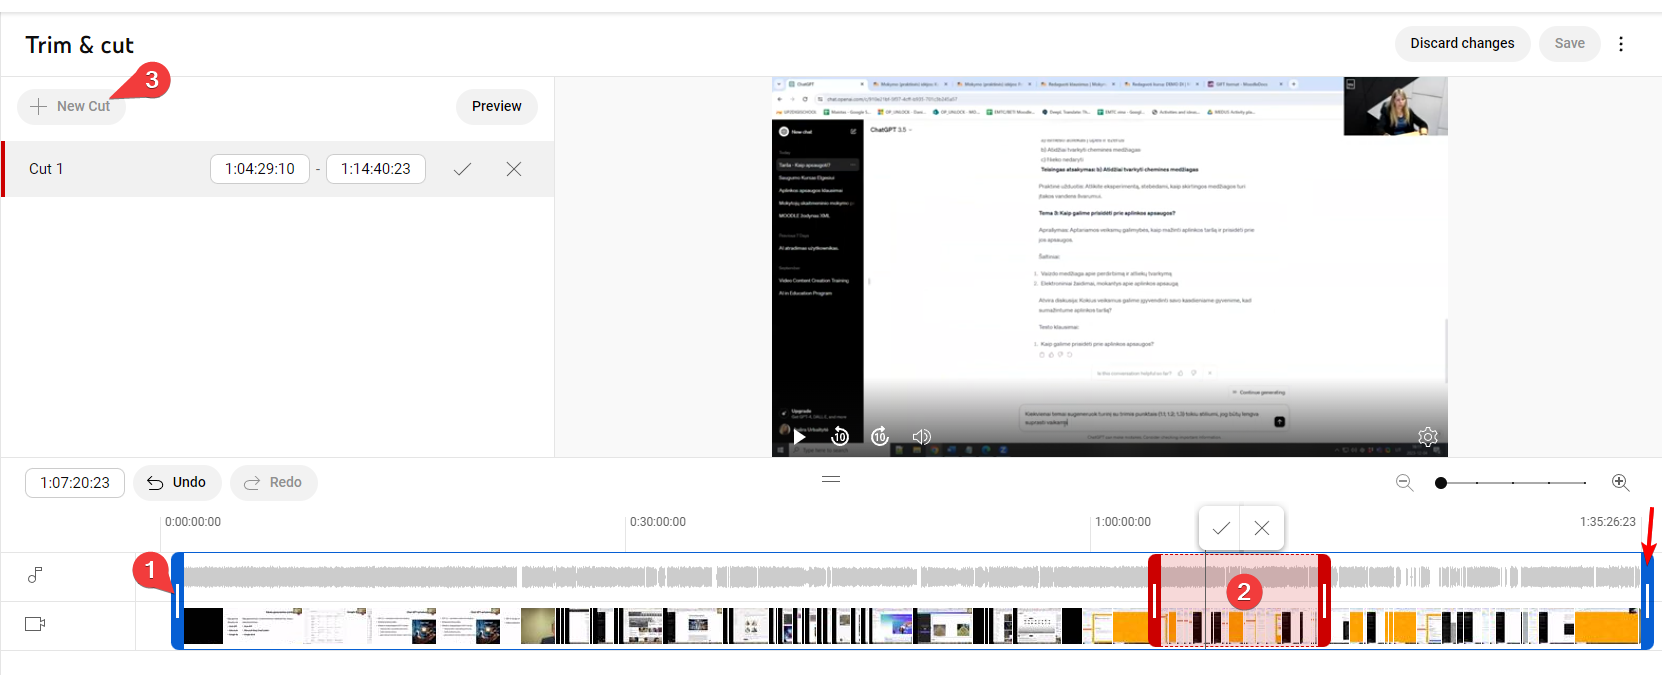
- Trim your video. You can cut out the beginning, middle, or end of your video on a computer. You don't have to re-upload a video to trim it. Select Trim & cut . A blue box will appear in the editor.
- Trim the start or end of your video (1). Drag the sides of the blue box. Stop when the box is covering the portion of the video that you’d like to keep. Anything not in the box will be removed from the video.
- Take out a section of your video. Click NEW CUT (3). A red box will appear in the editor (2). Drag the sides of the red box. Stop when the red box is covering the portion of the video that you’d like to remove. Anything not in the red box will remain in the video.
- Audio. You can change your video’s audio track with music and sound effects after you upload.
- Blur faces. Blur the faces of anyone appearing in your video via the ‘Enhancements’ Tab. You can control the setting, too, with the ‘Custom Blur’ option.
- End screens: Add an end screen to the last 5-20 seconds of your video, showcasing additional videos, playlists, links, and subscribe buttons. You can even apply templates to simplify the process.
- Cards: Cards can point viewers to a specific link (from a list of eligible sites) and show customized images, titles and calls to action.
Interactive videos with H5P
- As useful as video is, it can still result in a passive viewing experience for students. As with all content, we want to make students’ experiences more interactive and create opportunities for checking understanding and providing feedback. This can be achieved by using the H5P Interactive Video content type.
- The H5P Interactive Video content type allows you to enrich video content further by adding interactive elements.
- The Interactive video content type allows you to add interactions on top of video clips. Interactions such as images, elaborating text, links and quizzes pop up while the learner watches the video.
- H5P tools are integrated into Moodle. You can create the content with H5P from the interactive content bank or add it as an H5P activity.
- H5P official documentation and examples, and you can try them here: https://h5p.org/.